How to Migrate Liferay 6.2 to 7: a Comprehensive Guide

Liferay migration. Real examples. Step-by-step instructions. Screens.
The article is written by mutual efforts of Vitaliy, Senior Liferay Developer, and Julia, Writer.
While people are still hotly debating on the buzz that Liferay is going to terminate supporting CE edition, many of you are probably on the way of upgrading your digital experience platform. Otherwise, you wouldn’t read this article.
Liferay 7.4 breaking сhanges from a tech perspective
Let’s list some key benefits of Liferay 7.4 CE release for developers:
- Streamlined and modular architecture makes Liferay 7.4 simpler.
- It is leaner that facilitates deployment.
- You can compose and reuse modules with a modular development paradigm.
- Reusability of services is available with the CLP mechanism.
- Extensions are simpler, easier to maintain, more dynamic. Optimized for your tooling of choice.
- Configure your code with an auto-generated UI System Settings just on the go.
Before we proceed to steps on how to migrate Liferay 6.2 to 7, let’s go through the list of changes that can affect your system after migration.
| Removed: |
|
| Changed: |
|
| Replaced: |
|
| Refactored: |
|
| Disabled: |
|
| Renamed: |
|
| Moved: |
|
| Updated: |
|
These improvements of DXP 7.4 are tempting. Below, I’ll give you a tutorial on how to migrate data and code from Liferay 6.2 to 7 to make your upgrading process a piece of case.
I. Prerequisites
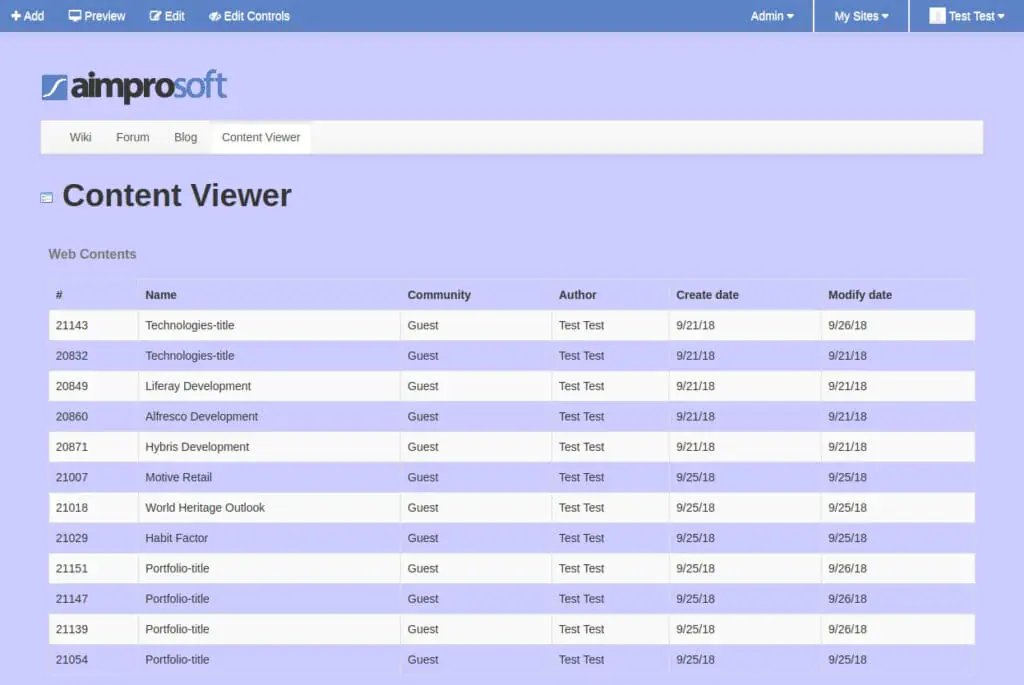
As the majority of our projects are under NDA and I can’t share with you any client’s project, therefore, I had to create a demo project to show you screenshots with visual illustrations of Liferay 6.2 to 7 migration. It contains a custom theme, layout, portlet, and hook. Also, I configured a set of pages and web content on the portal so that you can see it in practice.
When choosing a repository, usability always goes a long way for me. Therefore, I favored Bitbucket to deploy an original Liferay 6.2 code. I’d recommend this repository for many reasons. It allows the creation of unlimited private repositories and works well for sharing demo projects and collaboration of small dev teams. And then on top of it, we just like to try some new hyping stuff in Liferay development, why not?
As somebody who is already familiar with default modules, you’re not going to surprise by these four examples to be migrated:
- aimprosoft-portlet — a custom portlet for displaying a list of web contents, documents, wiki pages, documents and blogs from the portal;
- aimprosoft-theme — a custom theme (based on classic one) with 2 color schemes (orange and blue) and 2 theme settings (‘split-dockbar’ and ‘navigation-enabled’);
- 1-3-column-layouttpl — a custom layout;
- aimprosoft-hook — a JSP hook for the Sign In portlet to display a greeting message.
To demonstrate the migration of web content structures, I took “technology” and “portfolio” pages:
- “Technology”, fields: “header”, “logo”, “description”.
- “Portfolio”, fields: “header”, “icon”, “description”, “link”.
Well, there are two types of pages to be aware of: public and private. All pages in the portal are part of sites. They differ in access. All users can see public pages, but private ones are reachable only to authorized members of the site. It’s one of the main idea of this solution – creating a closed collaborative environment for members of one single organization.
So, I chose the most popular pages which are the starting point in using the portal and I’m comfortable with.
Public pages:
- Welcome
- Portfolio
- Technologies

Private pages:
- Wiki
- Forum
- Blog
- Content Viewer
II. Prepare for migration
LIFERAY 6.2 PREPARATIONS BEFORE MIGRATION
Before migrating, let’s do a little housekeeping. We need to clear data from old versions, duplicates and other unnecessary files. Then do not forget to download Liferay 7.1 CE at this step.
Remove unused objects
To speed up the Liferay 7 migration process, and also to increase the performance of the portal after migration, we need to remove unused objects (Layouts, Users, Documents, etc.). Liferay procreates intermediate versions of web contents and documents every time the content is edited. For example, if we have web content updated three times, there are four different versions:
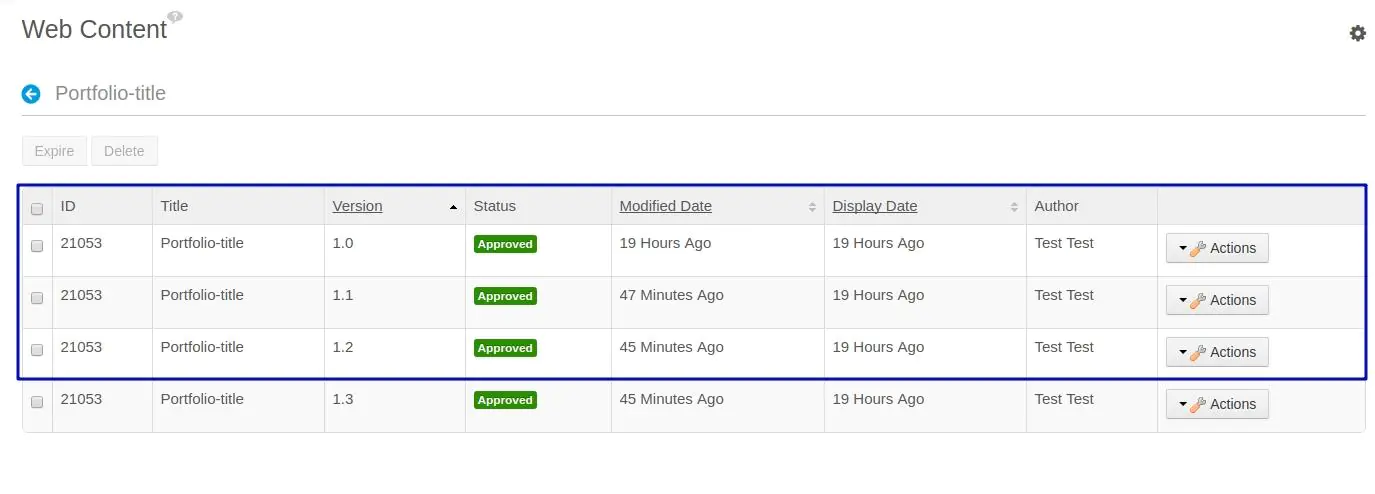
The portal always contains multiple contents with old versions. Instead of this bulk of files, it’s sensible to migrate only the last one (1.3). Three featured ones can be removed. Thus, we can facilitate migration time and reduce the volume of moving data.
Sure, you can do it manually if you have sufficient time for it. But I like fast actions; therefore, I used Liferay API that allows working with objects (to extract from the database, check, or delete, if needed). API for documents and API for web content will give you a piece of relief. You will need only to write a piece of code to do it.
Remove duplicated structure names
If you have different web content structures (text, images, links, checkboxes, etc.) in your portal, they are likely to have fields with the same names. It’s OK for the 6.2 version, but migration to 7.x will fail because Liferay DMX requires having unique names of fields. Therefore, we need to rename structure fields, so they are unique overall to the portal.
Liferay 7.1 installation/configuration
First of all, download Liferay 7.1 from open source apps and software directory SourceForge. The platform was seen to cover needs beyond a basic CMS like WordPress, Joomla, or Drupal. That’s why the founders chose SourceForge to make the code reachable for the people right away. And I like that.
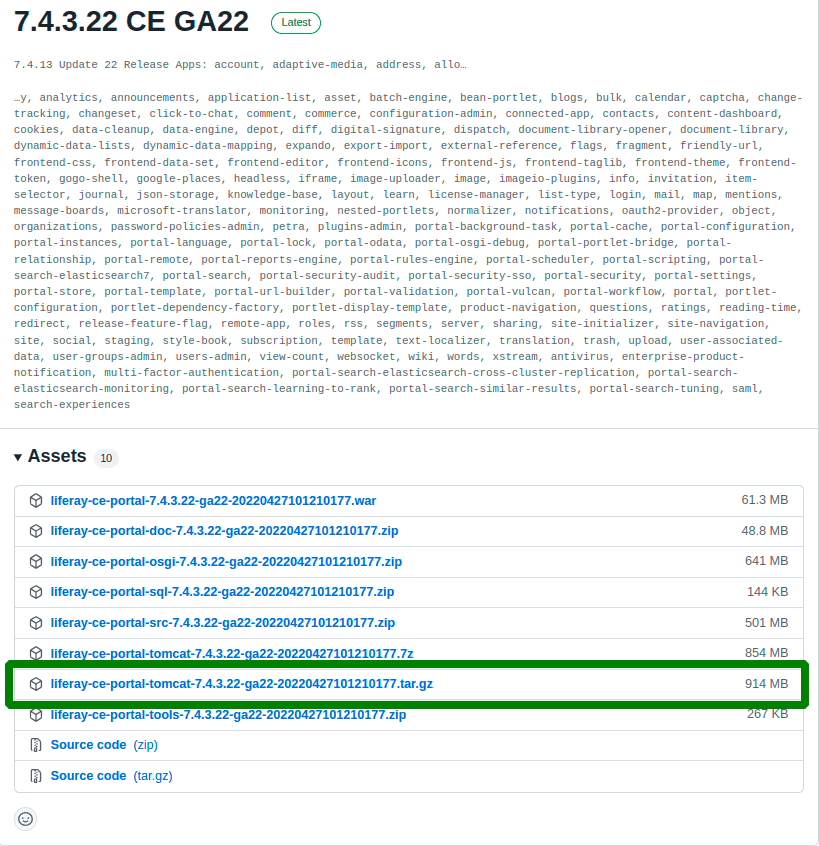
Unpack the Liferay archive but do not start it for now.
Tools/instruments
There are different tools/plugins to work with Liferay 7.x. It depends on which IDE you work with, and which tool to use. Personally, IntelliJ IDEA. If you use IDEA too, you can install Liferay IntelliJ Plugin for it. Eclipse, NetBeans, and SlickEdit are also good, but sometimes they aren’t always reliable, lag, and not scalable enough. With IDEA I can set up a project easier.
It allows you to set up a Liferay workspace, configure its server, create different modules from templates, deploy them, etc. For those who work in Eclipse, there is Liferay Developer Studio and Liferay IDE. Although I’m not a fan of Eclipse, I have to admit that it has better integration with Liferay and more opportunities even for the code migration process. I will refer to a subject later.
III. Liferay database migration
This paragraph involves migration steps of the Liferay database.
PREPARE DATABASE FOR MIGRATION
-
Create a separate database for migration in MySQL:
create database lr_migration_dxp character set utf8 -
Create a database dump from 6.2 database and load it to new one:
mysqldump -uroot -p1 lr_migration > lr_migration.sql
mysql -uroot -p1 lr_migration_dxp < lr_migration.sql
-
Specify database connection properties
Create file ‘portal-setup-wizard.properties’ with the DB connection properties inside:
jdbc.default.driverClassName=com.mysql.jdbc.Driver
jdbc.default.url=jdbc:mysql://localhost:3306/lr_migration_dxp
jdbc.default.username=root
jdbc.default.password=1
Note: DO NOT START the Liferay instance right now. Otherwise, you’ll get an error like this:
2022-05-12 13:44:57.402 ERROR [main][MainServlet:273] java.lang.RuntimeException:
I couldn’t ignore it and first had to upgrade to Liferay Portal 7100
java.lang.RuntimeException:
Then you must first upgrade to Liferay Portal 7100
at com.liferay.portal.tools.DBUpgrader.checkRequiredBuildNumber(DBUpgrader.java:87)
(See errors list at the end).
Copy data
To transfer document library files to the new environment, copy document_library and image folders into the data folder from 6.2 to 7.1. The migrated data will be stored in the default store. A location you can choose up to you.
Disable indexer and autoUpgrade
Since we are going to start the upgrade Liferay 6.2 to 7.2 process in our new installation, we have to disable indexing and create files for this. I did it to prevent reindexing content and performance issues from arising.
I added a file
com.liferay.portal.search.configuration.IndexStatusManagerConfiguration.config to my folder [Liferay Home]/osgi/configs with the following content:
indexReadOnly=”true”
Then I added a file
com.liferay.portal.upgrade.internal.configuration.ReleaseManagerConfiguration.config to the same folder [Liferay Home]/osgi/configs with autoUpgrade=”false” content.
Now indexing is completed and we can proceed with the configuration.
Configure the upgrade tool
Unlike previous Liferay versions, where we had just to specify database configuration properties, and Liferay performed an upgrade process during the startup, Liferay 7.x comes with a dedicated tool for DB upgrade ‘portal-tools-db-upgrade-client’ in the LR/tools folder.
We need to configure the following files before running the upgrade:


We should check a release buildNumber before running the upgrade tool because it is incremented by Liferay after each deployment in Service Builder which is used for generating internal database persistence code.

It should be 62xx before you run the upgrade.
Running the upgrade tool
Here we invoke the upgrade tool with the script ./db_upgrade.sh -l for Linux and “db_upgrade.log” for Windows. This will update the Liferay core and output this message after finishing:

Then run the command upgrade:executeAll to execute all pending module upgrade processes. Gogo Shell will allow you to do it by appearing on the screen. To launch Felix Gogo Shell, you need to execute the command “telnet localhost 11311” in the command line.
Finally, just wait for a while to see the desired message after updating all the modules are completed:
Verification is executed in the core automatically. You need to check out a buildNumber to ensure the portal has been updated successfully:

Enabling indexer
The most important step of post-upgrade is enabling indexer. To do this I modified the file com.liferay.portal.search.configuration.IndexStatusManagerConfiguration.config in the folder [Liferay Home]/osgi/configs with the following content:
indexReadOnly=”false”
Good job, dudes. You’re almost at the end. Now let’s start Liferay.
Starting Liferay
We’ve been working really hard. Start Liferay and ensure that the database has been updated successfully. The database migration should be finished at this point. In the next chapter, I will describe how to make a code migration. It’s time to say a few words about migration process automation.
Liferay migration process automation
Although there are not too many steps to perform the migration; it still requires a lot of manual work with configuration files, creation/restore dumps, copying files, etc. Moreover, if there are any errors during migration, you need to perform all these actions again and again from the beginning.
To automate this process, I have created a bash script that performs all the actions above. It’s available here. You just need to specify your properties as it is showed below:
Properties
#MySQL
db_user=root
db_password=1
#LR 6.2
lr62_path=/home/vitaliy/Work/Liferay/migration/liferay-6.2-ce-ga4/liferay-portal-6.2-ce-ga4
lr62_db_name=lr_migration
#LR 7.1
lr71_path=/home/vitaliy/Work/Liferay/migration/liferay-ce-7.1.0-ga1
lr71_archive=liferay-ce-portal-tomcat-7.1.0-ga1-20180703012531655.zip
lr71_dir=liferay-ce-portal-7.1.0-ga1
lr71_db_name=lr_migration_dxp
Have you got it? I’m sure, yes. So now run the script ./migrate.sh.

After finishing the script database and data should be already migrated. You can start your 7.1 (7.x) instance and check the results.
What I’ve got is a virgin Liferay portal now so pure and beautiful:
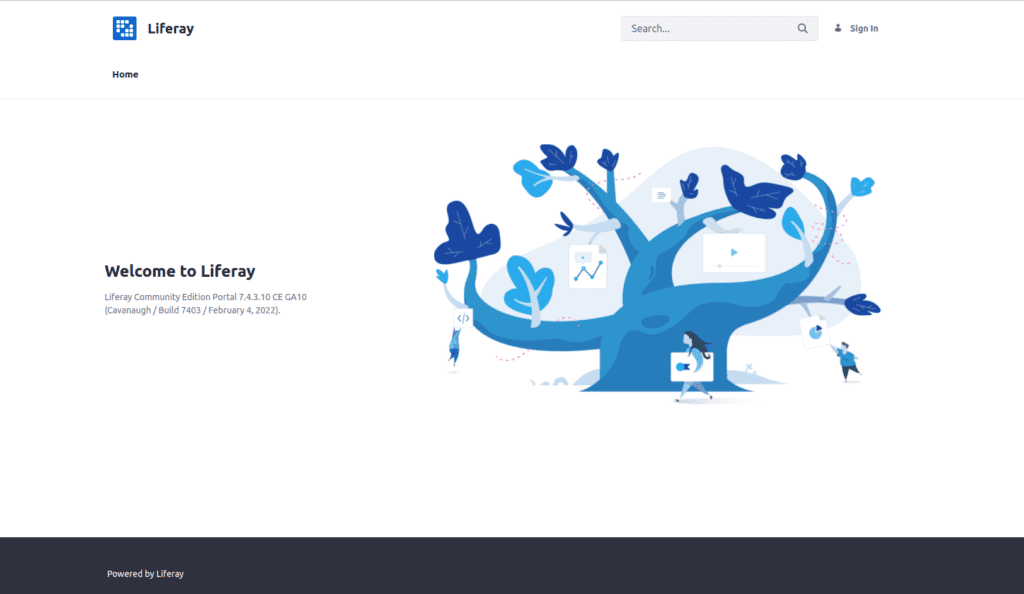
Although there is still no custom theme, layout, or hook changes; all the data (pages, content, etc.) is in place, and we can start with code migration.
IV. Code migration
For code migration, you need to set up a project environment. I use IntelliJ IDEA IDE with Liferay IntelliJ Plugin, Liferay 7.1 bundled with Tomcat, Maven for assembling, and MySQL as a database. All the instructions below are relevant for this stack.
IDE SETUP
I like this Liferay’s liberal position about tools choice. It’s up to a developer what tool to choose for generating and managing the project. Liferay’s default Gradle management system doesn’t suit me perfectly. So I preferred Maven. There are several Maven plugins with artifacts which I can use for module development. A Liferay Workspace works well to create and manage a structure for folds and files built with Maven.
First, I created a new project using Liferay Maven Plugin:
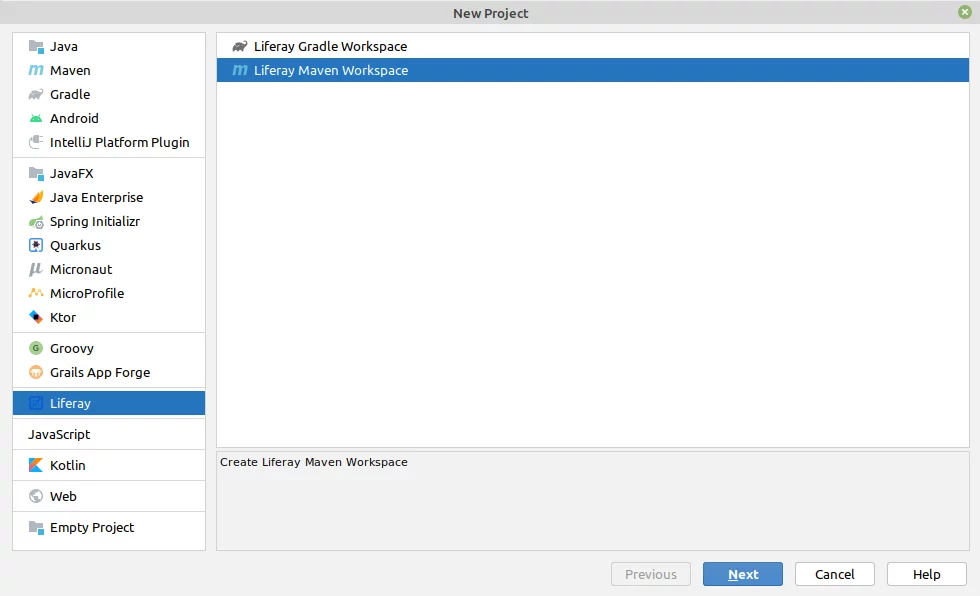
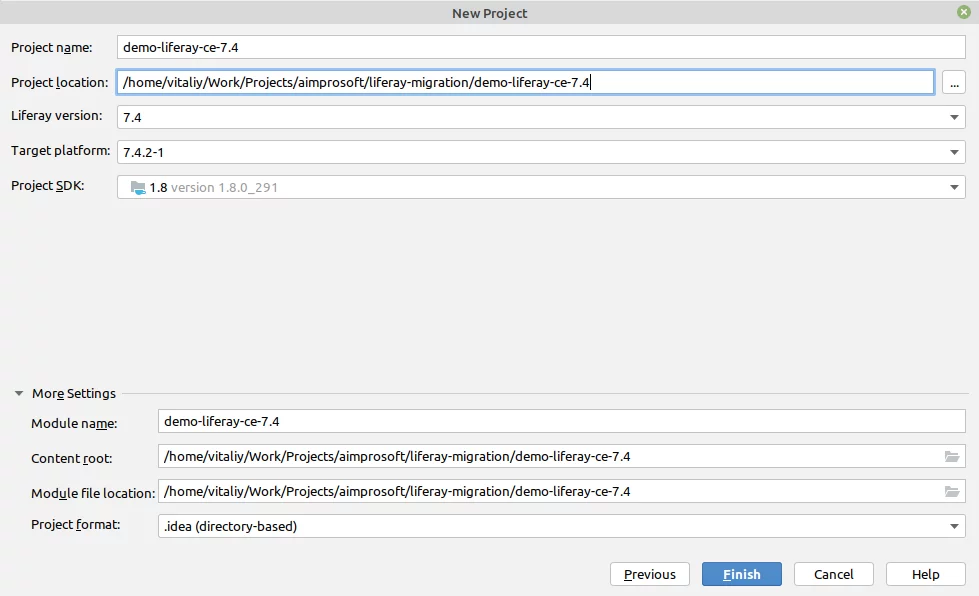
When you have a new project done, you will see the following structure displayed:
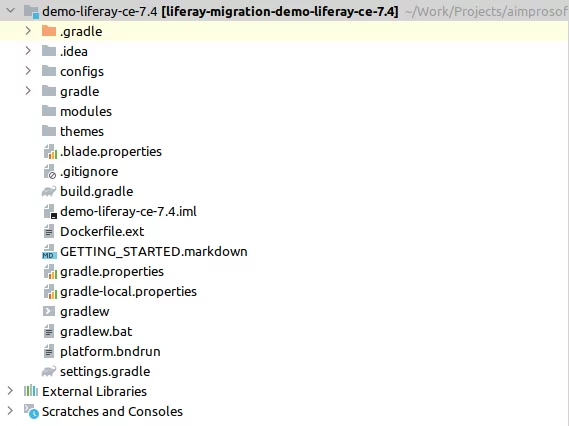
Go on with configuring a server in IDE as I did:
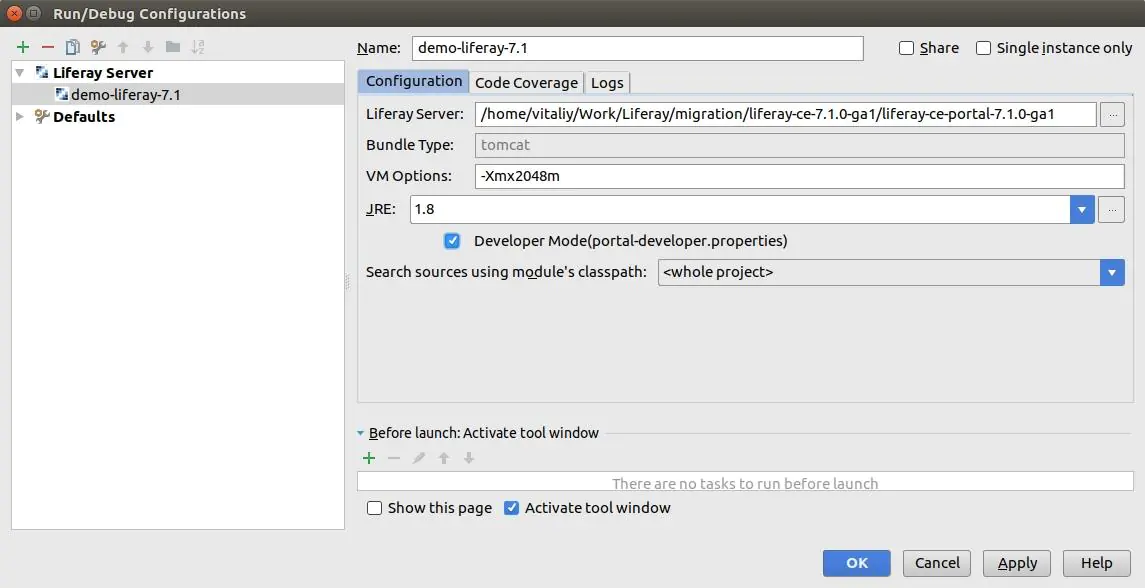
Congrats! Now you can start the Liferay 7.x portal from IDE.
Liferay theme migration
Before starting theme migration, we should consider the main points which were changed in 7.1 or 7.x versions:
- Velocity templates are no longer supported in favor of FreeMarker;
- Dockbar has been replaced with different menus: Product Menu, Control Menu, User Personal Bar.
Ways to update theme:
yo liferay-theme:import Note: this way works only for themes, created with Ant-base Liferay plugin SDK. Otherwise, such an exception will appear:

-
Liferay Theme Importer
yo liferay-theme:import
Note: this way works only for themes, created with Ant-base Liferay plugin SDK.
Otherwise, such an exception will appear:
If you don’t like a dry sense of humor by Darth Vader, just follow my tips.
-
Use Liferay IDE’s Code Upgrade Tool:
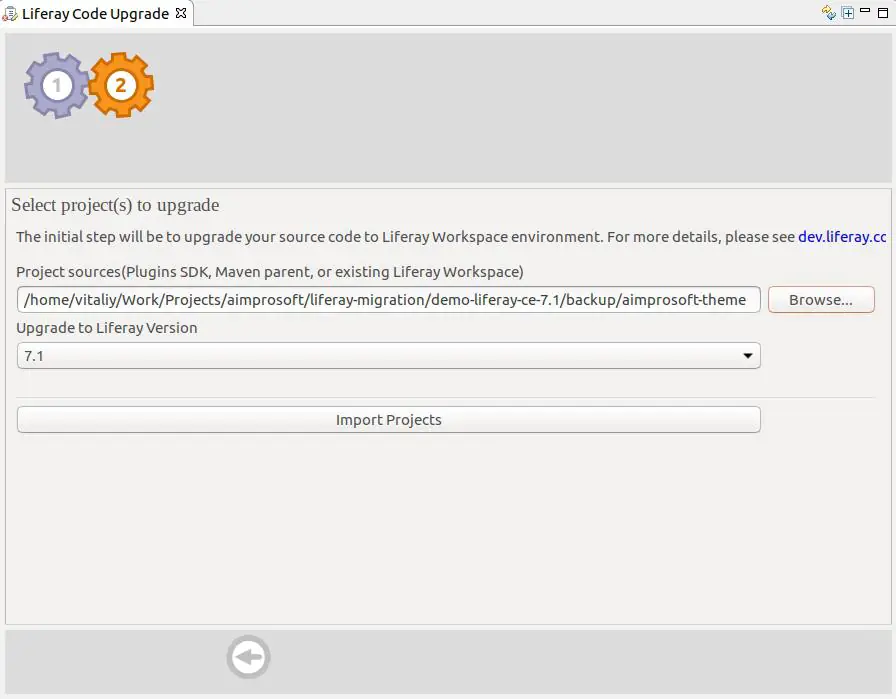
Liferay code upgrade While the upgrade tool automates the migrations process, there are still restrictions for theme structure.
-
Manual theme creation and code transfer
Although it’s not an automatic process and needs some effort. Sometimes it’s easier to create a theme from scratch in 7.1 and apply appropriate styling from 6.2 given changes in Liferay between those versions.
Well, let’s try to create a new theme using the Liferay plugin:
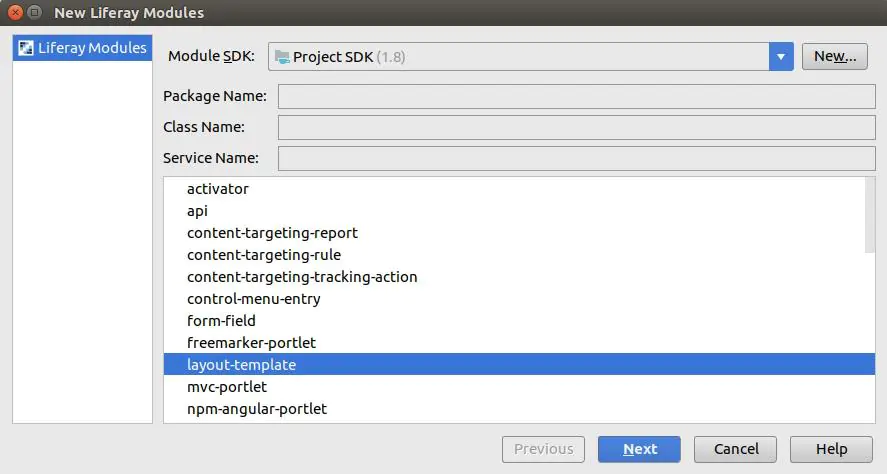
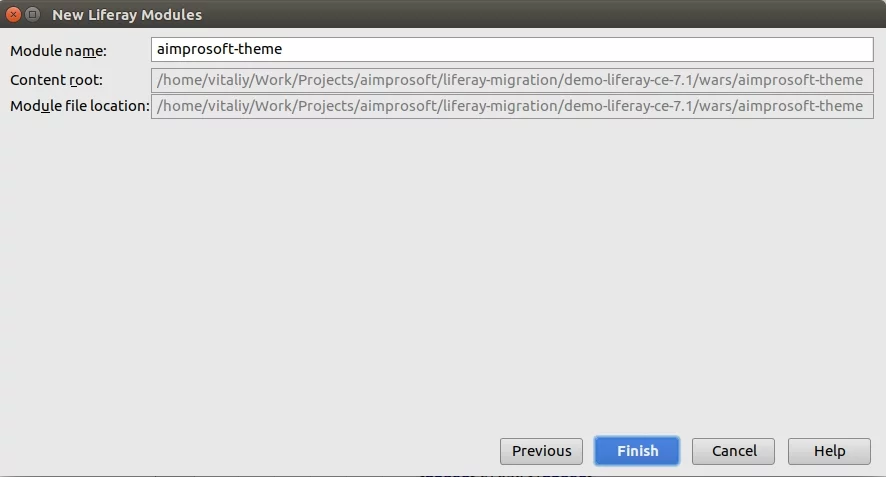
Score! Now you’ve got an empty, but working theme created. After this, we can apply changes from 6.2 themes taking into account changes in 7.1.
As in version 6.2, we can also use a classic theme as an example and overwrite required sections (FTL templates, CSS files, etc.).
Liferay portlet migration
To migrate portlet code, I used the Code Upgrade Tool in Liferay Developer Studio (Project -> Liferay Code Upgrade Tool menu). After importing the project we can click the “Find breaking changes” button, and a list of code problems will appear:
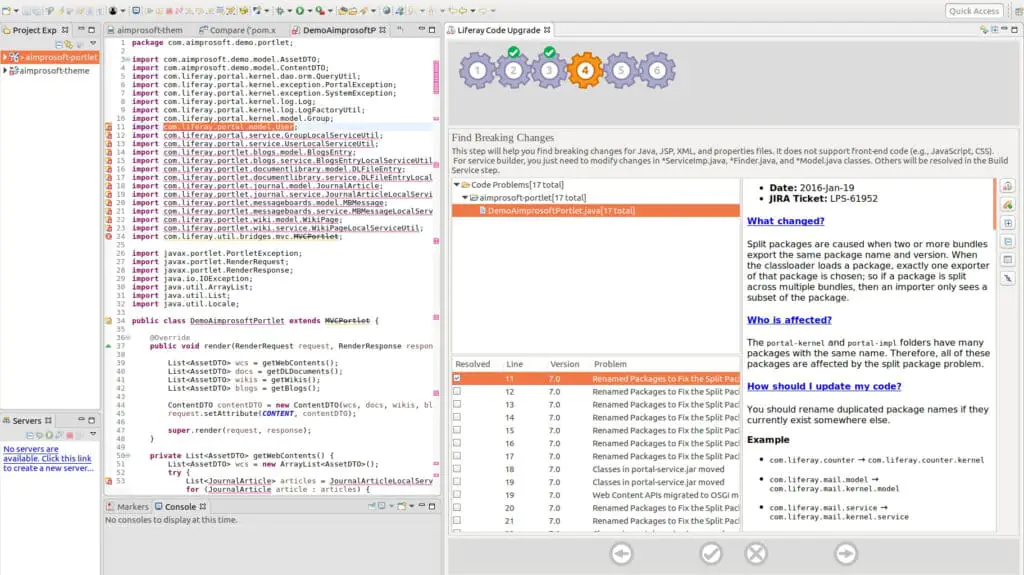
Each of them contains API changes explanation, which affects custom code, reasons for it, links to Liferay JIRA tickets, examples and recommendations to fix code issues. Some of the code problems can be fixed automatically using Liferay IDE, other ones need manual actions.
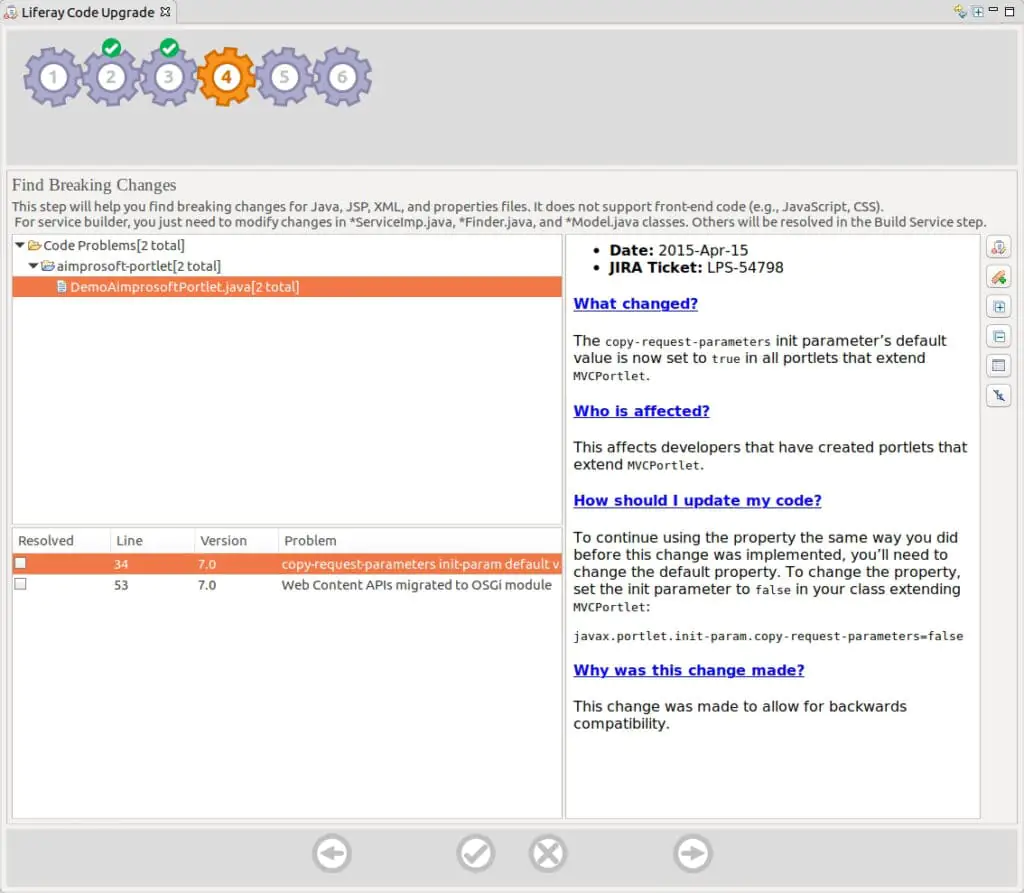
After fixing all the issues, you can try to build the portlet for Liferay 7. If you work in IntelliJ IDEA, you can copy migrated code to it from Liferay IDE.
Liferay hook migration
For hook migration (especially for JSP hooks) it’s better to create a hook module from scratch and overwrite the required JSP page. As Liferay’s JSP pages have changed significantly from Liferay 6.x to 7.x, using old 6.2 JSP pages for the new 7.1 Liferay may break some functionality.
So, you need to create a hook module, find the appropriate JSP, and overwrite it in the hook, copying changes from 6.2.
To find what exactly was changed in hook, you can compare 2 JSP files in your Liferay 6.2 instance, xxx.jsp (hooked one) and xxx.portal.jsp (original one). In my example:

Then just apply these changes to your Liferay 7 page and deploy the hook.
Liferay layout migration
For layout migration we can create a new layout with Liferay IntelliJ plugin:

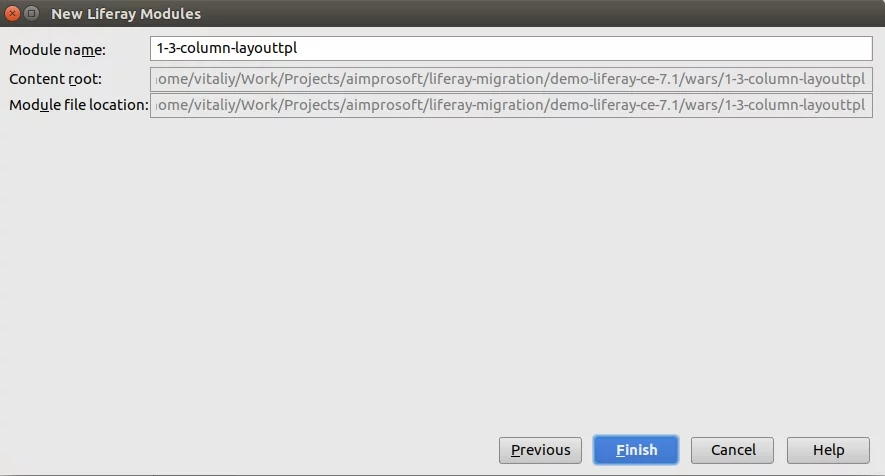
After that we can adjust FTL template according to the 6.2 code, for example:

Now you are free to change an icon for the layout, deploy the layout, and use it.
V. Post-migration issues
After migration to 7.1 make sure that an indexer is enabled. Modify file com.liferay.portal.search.configuration.IndexStatusManagerConfiguration.config in [Liferay Home]/osgi/configs with content:
indexReadOnly=”false”
Also, you need to set up a standalone Elasticsearch instance that can index Portal’s content. Installed by default as an embedded service it can be used for local development, but not for production. I’m not going into how to install Elasticsearch in this article. You can get the details here.
Let’s elaborate on some typical errors you may face during migration.
VI. Common errors during migration
I summed up a list of errors that may occur during migration to 7.1.
1. You must first upgrade to Liferay Portal 7100
| Name |
java.lang.NullPointerException at com.liferay.portal.events.ThemeServicePreAction |
| StackTrace |
ERROR [main][MainServlet:273] java.lang.RuntimeException: You must first upgrade to Liferay Portal 7100 at com.liferay.portal.tools.DBUpgrader.checkRequiredBuildNumber(DBUpgrader.java:87) |
| Description | Exception is thrown, when Liferay 7.x is started with 6.x database before running upgrade tool |
| Fix | Run upgrade tool before starting Liferay 7 |
2. NullPointer when upgrading DDM
| Name |
com.liferay.portal.kernel.upgrade.UpgradeException: java.lang.NullPointerException |
| StackTrace |
com.liferay.portal.kernel.upgrade.UpgradeException: java.lang.NullPointerException at com.liferay.portal.kernel.upgrade.UpgradeProcess.upgrade(UpgradeProcess.java:97) at com.liferay.portal.kernel.upgrade.UpgradeProcess.upgrade(UpgradeProcess.java:134) … Caused by: java.lang.NullPointerException at com.liferay.dynamic.data.mapping.internal.upgrade.v1_1_2.UpgradeDynamicDataMapping$SelectDDMFormFieldValueTransformer.transform(UpgradeDynamicDataMapping.java:356) at com.liferay.dynamic.data.mapping.util.DDMFormValuesTransformer.performTransformation(DDMFormValuesTransformer.java:58) at com.liferay.dynamic.data.mapping.util.DDMFormValuesTransformer.traverse(DDMFormValuesTransformer.java:78) … |
| Description | The exception is thrown when there are orphaned templates (w/o structures) |
| Fix | Delete such templates in 6.2 before migration to 7.1 |
| LPS |
https://issues.liferay.com/browse/LPS-82417 https://issues.liferay.com/browse/LPS-69800 https://issues.liferay.com/browse/LPS-69921 |
If the issue still exists after migration, you can prevent the NPE if you start Liferay from IDEA in debug mode. Then run the upgrade process from Felix Gogo Shell and change the value in evaluator:

3. NullPointer when missing theme
| Name |
java.lang.NullPointerException at com.liferay.portal.events.ThemeServicePreAction |
| Screen |
 How to fix Liferay NullPointer missing theme |
| StackTrace |
com.liferay.portal.kernel.events.ActionException: java.lang.NullPointerException at com.liferay.portal.events.ThemeServicePreAction.run(ThemeServicePreAction.java:46) at com.liferay.portal.kernel.events.Action.processLifecycleEvent(Action.java:34) at java.lang.Thread.run(Thread.java:748) … Caused by: java.lang.NullPointerException at com.liferay.portal.model.impl.LayoutImpl.getColorScheme(LayoutImpl.java:358) at com.liferay.portal.events.ThemeServicePreAction.servicePre(ThemeServicePreAction.java:72) at com.liferay.portal.events.ThemeServicePreAction.run(ThemeServicePreAction.java:43) … 113 more |
| Description | Null pointer is thrown, when there is missing theme |
| Fix | Deploy missing theme |
4. PwdEncryptorException: invalid keyLength value
| Name |
PwdEncryptorException: invalid keyLength value |
| StackTrace |
com.liferay.portal.kernel.exception.PwdEncryptorException: invalid keyLength value com.liferay.portal.kernel.exception.PwdEncryptorException: invalid keyLength value at com.liferay.portal.security.pwd.PBKDF2PasswordEncryptor.encrypt(PBKDF2PasswordEncryptor.java:90) at com.liferay.portal.security.pwd.CompositePasswordEncryptor.encrypt(CompositePasswordEncryptor.java:51) at com.liferay.portal.kernel.security.pwd.PasswordEncryptorUtil.encrypt(PasswordEncryptorUtil.java:74) at com.liferay.portal.security.pwd.PwdAuthenticator.authenticate(PwdAuthenticator.java:44) at com.liferay.portal.service.impl.UserLocalServiceImpl.authenticate(UserLocalServiceImpl.java:5789) at com.liferay.portal.service.impl.UserLocalServiceImpl.authenticateByEmailAddress(UserLocalServiceImpl.java:1255) at sun.reflect.NativeMethodAccessorImpl.invoke0(Native Method) |
| Description | Exception is thrown when there is specified incorrect password encryption algorithm |
| Fix |
Add this property passwords.encryption.algorithm.legacy=SHA into portal-setup-wizard.properties file. |
Should I upgrade to Liferay DXP 7.4?
You definitely should perform a Liferay 6.2 to 7.4 migration if the following upgrades can streamline your organization’s operation:
Data-driven insights
Data-driven insights for digital experiences are available with:
- A/B Testing for any page elements not only buttons;
- The Content Audit allows content list filtering;
- Content Performance is now available in Content, Widget, and in Display Pages with metrics for search (Organic and Paid).
Richer digital experiences
Richer digital experiences are possible with:
- Asset libraries with Display Page Templates;
- Duplicated and drafted experiences;
- Navigation Menus allows using Display Pages as items;
Seamless B2B buying experience
Seamless B2B buying experience is enriched with:
- prices and discounts are easy to be changed;
- widget for a visual representation of the organization structure;
- appropriately sized images of products.
Low-Code / No-Code capabilities
Low-Code / No-Code capabilities for business users via:
- Adaptive image size in Content and Display Pages;
- Filter, search, and sort with the Collection Display Fragment;
- Reuse the same Collection Provider for different scenarios;
- New field types and additional properties in Forms;
- Related Items can be displayed on a wide range of other items;
- Enhanced Site Navigation for content-heavy sites;
- Create custom business objects through the UI with Liferay Objects.
Cost-effective launch and maintenance
The cost-effective launch and maintenance are achieved through:
- Staging in Asset Libraries reduces cost and efforts for content organization;
- Expiration dates for more scrupulous management of Documents and Media;
- A common UX for Forms, Web content, and Documents and Media;
- Folders for Documents and Media are now available in the Item Selector;
- JS Dependency Declaration means creating projects by specifying the Liferay version;
- Liferay Enterprise Search (LES) for all DXP subscribers;
- Broader collaboration on Publications;
- Less Reindex actions to selected Virtual instances;
- Improved performance and flexibility of site template propagation;
- More control of published Parent pages with System-Level configuration;
- Less CSS footprint loaded for each page affected Theme Architecture;
- Translation of the inline content of Content Pages;
- Video and audio preview is available with FFmpeg instead of Xuggler.
Interconnected enterprise landscape
Liferay-based interconnected enterprise landscape now works with:
- Accounts from Liferay Commerce are now available to all users even for non-Commerce scenarios;
- Audit information now is included in system logs;
- Integration with a number of Click-to-Chat platforms;
- Headless RESTful APIs;
- Multi-factor Authentication (MFA) to online services (mobile and desktop environments);
- OAuth 2 applications are authorized automatically as Trusted Applications;
- Configuration of OpenID Connect in System Properties to go through a proxy;
- Remote Apps (outside the DXP environment) allow registering remote JS files as Web Components.
THE BOTTOM LINE
As you can see, it’s not that complicated to convert Liferay 6 to 7 for competent developers. In this article, we’ve overviewed the process of migration for a demo project that can be accomplished by a Liferay development company. For those who have a portal with needs beyond a simple static website, we can help with Liferay portal migration. Me or one of my senior colleagues can consult you on Liferay development solutions. Just drop us a line.
Frequently Asked Questions
When should I migrate to the higher version?
Reasons to migrate from the old version, e.g., Liferay migration 6.1 to 7.1 or Liferay migration 6.1 to 7.3, to the new depends on your needs. You may want to leverage new features of the latest Liferay versions, make a better user experience, or optimize portal performance.
How long does it take to migrate Liferay?
Transitioning from legacy technology, you should pay attention to the period of data and code migration. As is common, data migration takes from a couple of hours to a couple of days if you follow the migration guide. The period of Liferay 6.2 to 7.2 migration of code highly depends on the project size and level of Liferay customization in the code. It may require up to a month for medium projects.
How many resources (RAM/HDD) does Liferay need?
First, you should define your minimum requirements. They will depend on your installation and platform edition. In some cases, it is enough 8GB of RAM as a minimum; for others, it will require more. The HDD memory starts from 2GB for Liferay installation and database storage.
What is the latest Liferay version?
Before migrating Liferay 6.2 to 7.1, you can check the current version in the top info banner in the tab following the path “Control Panel -> Configuration -> Server Administration -> Resources” or the console log starting up the server. If your version is lower than 7.4, then you’ve got something to look forward to. This is the last one.


